#but no.. it’s too tiny for a sew machine
Explore tagged Tumblr posts
Text


I haven’t taken Kei out in a while. He’s getting dusty.. so I took him out to pick some mint n make some lemonade
#ajin#kei nagai#pocket kei#Ajin nendroid#I have been wanting to practice sewing on the new sewing machine we got#so ofc I thought making Kei clothes would use the least amount of fabric n spend the least amount of time…#but no.. it’s too tiny for a sew machine#I nearly broke the machine n I cut my hand open trying 😭😭#maybe it was the fabric I used. maybe a different kind will be better#but it is hard when the stuff is SO tiny you can’t even see what you’re doing#and like I said idk how to use a sewing machine#I don’t even know how to sew#I’ve bullshitted all my projects so far 😭
7 notes
·
View notes
Text

My beautiful girlfriend who's so small I had to crochet his outfit out of embroidery thread
#he's so tiny I had to hand sew everything. the sewing machine would have ate him#too tiny to make clothes for#I should at least make a under skirt with ribbon or fabric for the cloak thing because currently this is a pussy out kinda look#obey me leviathan#obey me#crochet#embroidery#sewing
97 notes
·
View notes
Text
somehow, I don't know how, but somehow sewing machines always know when you're nearly done with a project and pick that exact moment to throw a hissy fit
#sewing#sewing machines#I am so close to finishing this dumb swimsuit that I started in 2020 for a vacation that ended up not happening#and which I stuffed into a shoebox and into the back of my sewing stash when I realized I wouldn't get to wear it in 2020#then pulled it back out to finish for this family gathering coming up in a few days here#it's a one-piece suit and I hate one-piece swimsuits#and no one-piece has fit me off the rack since puberty so I'm stuck sewing it for myself#but I'm very happy with the design and relatively happy with the finished look#the idea is just to have something that is supportive and modest enough to wear around family#and in particular to wear to something like a waterpark with my nephews#something that won't ride up or fall down or come untied or anything like that#so it has a low-cut leg hole and a high-cut neck#and an entire invisible superstructure in the lining underneath to actually provide support and enclosure and all#it's plain black but it fits and supports and won't fly apart at the seams#but this very last step. oh this last step.#I had to drape the exterior bust area directly on me bc I can't account for curves and stretch and such if it's flat on the table#and then I had to wiggle out of it carefully with a ton of pins in the underarm and neckline area#I'm using a double-needle to top stitch the edges as a finish across the whole suit. it did one underarm and the neckline just fine!#but the turn from where the neckline meets the strap and down into the other underarm it just. won't do it.#it has thrown a fit and created a tangle of thread multiple times now. there are only 4" left to sew! just sew it!#it's not hard! we just did the exact same thing on the other side and it worked fine! but no! gotta throw a hissy fit!#ugh. anyway. I have removed all the thread and needles from the machine and turned it off and basically sent it to timeout lol#wrote this rant and gonna make myself some food and I'll fucking finish those last 4 inches later tonight or tomorrow#and then I have one tiny repair to something else I want to take on this trip. hopefully my sewing machine won't throw a fit over that too#istg the only projects this doesn't happen with are the ones that end with a bunch of handsewing#that's the way to trick my sewing machine I guess. but I'm not handsewing a swimsuit lol#at least I'm not so pressed for time that I can't just walk away from it for a bit. getting close to time to pack but not quite yet#my sewing#2024 mood#tagtalking
11 notes
·
View notes
Text
My sewing machine decided it's time to start giving random error messages again whenever I sew.
It's a cheap, 200 euro digital machine, you get what you pay for.
First repair was 3 years back, 110 euros.
This time the estimate is 120 euros.
I am gladly gonna pay for that because 1) I refuse to buy a whole new sewing machine just because the bobbin tension fucks itself every 3 years, 2) sewing machines are one of the few things that still have repair shops semi-widely available, and 3) machine quality and inflation are making it that I couldn't even find an equivalent machine for the same price if I wanted to.
#sewing#right to repair#reduce reuse recycle#the repair shop is right next to my place of work too#very tempted to get a mechanical backup machine#either something tiny or something old#ideally not a pfaff#just to mildly annoy the repair guy who prefers to work on pfaff#i will happily buy *more* sewing machines#used ones#just not to replace 8 kilos of technology that occasionally fumble with a tiny disc of thread#watch me eyeing the battery powered Barbie machine#“hey can you bring your sewing machine and hem my pants when you come over?”#*rocks up with a hot pink machine the size of a chihuahua*#thank you for coming to my ted talk#don't get a singer curvy if you have other options#if I could learn how to unfuck sewing machines myself I'd be a happy happy girl
8 notes
·
View notes
Note
Hey buddy!!! I have a few embroidery hoops, needles and thread, but aside from YouTube, nobody I know nearby does it often enough to give firsthand experience. I embroidered a thatch of lavender and a little bee on one of my battlejacket pockets, but it was with regular thread and a regular needle. Can you offer any insight when it comes to the actual hoops themselves, what material works best, any insider tips?
So I’m not a regular embroiderer because it hurts my hands really easy, but I AM a moron who does everything the hard way first so I do have some tips:
If you’re using regular thread, it will help the design if you a) use an embroidery needle [I think you can get them separate from other sewing supplies for like a buck or two, and I recommend getting some kind of needle polisher as well bc then it will last 538463936472 years] and double up the thread 2-3 times to bulk it up and 2) use a smaaaalll bit of glue mixed with water [or spit, I’ve done that too] to twist together the threads along their length. It just helps them go through smoother and lay flatter with less overall fiddling, and if you use School glue or spit it will wash out 👍
If you’re using bulk dollar store quality embroidery thread, you have to be *gentle as fuck* with it while youre working the design. So, work patiently in small sections and try not to yank it too much, just generally be aware that its not gonna stand much abuse until it’s actually stitched in. Also, it’s totally possible to take a pulled end, tie more on, and keep on a-truckin - just make sure you pull a few previous stitches to get to a more sturdy bit, and tie it real close so you’re not trying to pull the knot thru. It’s strength when pulled on leaves something to be desired, but it IS infinitely cheaper than buying every color ever individually for a few bucks each, so pick your poison on that one. If you wanna use good thread basically you need to have planning skills and the patience to wait till stores are open to drive out and go get shit, neither of which I have :D
As for hoops, they are So, So helpful oh my god. You can use them for darning, you can use them for embroidery, you can use them for cross-stitch, you can use scrap fabric to make patches, you can even use them to hold fabric taut to hand-stitch on patches if you need to.
Basically, If you need fabric to stay where the fuck you put it while you work, an embroidery hoop is a godsend. Most are also pretty adjustable - though you may have trouble using them with really really thick or stiff fabrics like fur or denim seams. in those cases you can always use scrap fabric to embroider your design, and then iron on or sew on your new patch.
In order to use one, you just need a bit of fabric that can reach to every curve of the hoop. you place your inner hoop under the fabric, plop your untightened outer hoop over it, and then tighten it up. in order to make the fabric taut, you can leave the hoop a liiiitle loose, and then pull at the fabric till it feels kind of like a drum. then tighten the outer hoop as far as it'll go :D Once youve done that, youre good to go.
I'd advise sketching your design in chalk/charcoal/pencil/washable marker before starting, and if you feel like it you can also mark out a grid pattern of dots using a ruler to keep your stitches the same length, but thats not super necessary.
As for fabrics that work best for embroidery, tight-woven felt is a nice backing for patches but you will struggle to get a clear sketch of your design. Cotton is gonna be easiest to use for a sketch, but its gonna be flimsier. If you can layer both inside the hoop, that would probably work out pretty well, tbh. I wouldnt use stretchy fabrics if you can help it- the resulting patch will likely shrink and the fabric itself is going to be difficult to work with especially if you arent using more expensive thread or a sharp, polished needle.
TLDR: Bulk up your normal thread and smooth it with watery glue, use an embroidery needle and make sure it stays polished, embroidery hoops are lovely, make any threadwork easier, and work best on non-stretchy fabric like denim, cotton, non-spandex poly blend, plastic leather, and probably natural leather if its thin enough.
#:Disclaimer: i am by no means an expert and get all my supplies from the dollar store and walmart bc i have no money#i dont know what a serger is and at this point im too scared to ask#i dont have a cutting table that is called my kitchen floor#pfff gl king honestly. sewing is like 60% fuck around and find out and 40% if you can get a sewing machine do that and make it an old one#bc they are BEASTS that WILL OUTLIVE YOU and also hate you but its okay if you give them blood sacrifice now and then#OH! and i havent gotten around to using mine yet but they DO sell teeny tiny sewing machines that look like staplers#they work like staplers too#i found mine for like 5 buckos off the bezos site#but you can probably find them elsehwere its jsut that bezos actually gets stuff to me and most other marketplaces dont
4 notes
·
View notes
Text
and when I learn to sew and make myself a green version of fav jumpsuit? or candlelight sessions jumpsuit? what then???
#been eyeing a sewing machine#I’ve wanted to learn for years but my aunt has been talking about taking a sewing class#and if she does I’ll probably take it too#so I’m feeling motivated!#I’m a doll collector so my initial motivation was making clothes for my dolls but now I wanna make clothes for me too#and of course I can make tiny jumpsuits for my dolls too lol
7 notes
·
View notes
Text
i woke up early today and am way too energised my brain is like spilling in circles but I still have not the right energy to be coherent or focus on actually doing anything with it
#thoughts#horrible feeling!#like tired but also way way way not.#the direct was fun. mario fans must have had a blast wow#not a bad thing I look forward to learning more of the peach game and the art style they went with for wonder is neat#uuuuh. oh I love the design of the glow pikmin they appeal to me very much. i haven’t played a pikmin game properly before but#I’m excited for 4 I’ve been wanting to get into it for a while now. uuuuhhhhhhh! silent hope seems neat ? dragon quest monsters too I like h#how it looks visually .wario ware is silly I don’t know if it’ll actually work but I like that it’s silly ?? I’m rambling to try to get#my energy to a manageable level I think it’s working talking takes So much energy#oh the the . i looked it up pennys big breakaway that seems cool I also like the visuals of that a lot#yeah this worked back to spacing out for me#wait the splatoon segment was weird that’s the last thing like. why’d they do that#maybe not back to spacing out exactly but definitely an improvement to when I started I’ll think of something else#oh I’ve been trying to learn to program in godot! it’s going slow since it’s a lot of reading and takes me energy pretty quick but#i think I’m doing well even if I can only do a little a day like I’m understanding it easy so far. don’t think I’ll be able to make anythin#anything for a while but making it feel less impossible to make something one day is nice#i made the tutorial turtle do a little dance : ) ! and I’ve been working on some crochet on and off. doing a bit more digital art though#just like sketching. i need to clean a bit so I can get my sewing machine set up I want to make little bags so I can carry more things#when I’m out. love having tiny bags for specific things in a big bag#oh and I’ve been reading about gardening a bit I need to map out the garden if I want to plant anything which I don’t know if I’ll be able t#to do any time soon but it’s still fun to think about and I hope I’ll be able to do it some time#ok words over I promise <3 back to art maybe goodnight
3 notes
·
View notes
Text
being not medicated for my adhd currently is sure. showing. i worked on two different sewing projects, a sketch for a print idea that i just had, and a sketch for a little sign i’ve been meaning to make for the kitchen door this evening... jumpin around
very excited about all of the things though. hoping my fingers won’t be rude about it
#art speaks#trying to avoid tempting carpal tunnel#i'm such a good little guy at not being evil when doing art but in conjunction with new bakery job... it's tingly#but! now that i'm pretty sure the sensations i'm having are very light carpal tunnel i am doing preventative stuff and paying more attention#to how i'm using my hands while at work so fingers crossed i make it not continue to happen#sewing has been the worst on it though bc needles are so little to hold but! borrowing a sewing machine rn so i shouldn't have to do-#too much more of the tiny hand held stuff myself at this point!#text
4 notes
·
View notes
Text
me, full of ongoing scrupulosity abt microplastics and also a vague sense that it would be good for me to take another crack at incorporating running into my life for 'holy shit i desperately need endorphins' reasons, scouring the shorts market for anything natural-fiber but also functionally/aesthetically fit for purpose and coming up almost* entirely blank: what if i bought another one of the merino-tencel tanks whose fabric i'm in love with (or‚ you know‚ sourced similar fabric somewhere that wasn't already a different garment‚ but like‚ that would involve learning things about 'where to get specialty fabric' in addition to the 'how to sew it' part) and turned it into running shorts? surely it couldn't be that hard??
⸻ * in fairness, icebreaker does make some that tbh are probably ideal except for cost but like. do i want to go running in basketball shorts? not really. and the tiny (women's) version only comes in black which is so dreary. i keep hoping they'll come out with some other colors but so far no dice! also an extremely crunchy-granola company makes some weird little gym shorts in a hemp knit which. i'm sorry, i grew up in manhattan and i'm dubious! they might be great but! 🧐
#yes it absolutely could#i mean there IS a sewing machine kicking around downstairs somewhere and i think according to Baby Sister it even works#so in theory i could re-teach myself how to use it#and also in theory a tiny pair of drawstring shorts shouldn't be *that* hard‚ i feel like??#(they say‚ totally naively)#i definitely don't really understand how you deal with curves. like i know sometimes you cut little notches into them but. when. why.#anyway i think actually normal running shorts are woven fabric and the tanks i'm obsessed with are knit so.#WOULD probs have to source different fabric.#this is too many humps to get over so realistically it's not going to happen#and frankly given that i already own nylon shorts it's like. what's the plan for those#like even if i did make tencel/merino ones to replace them… the other ones still exist#i guess if they just sat in a box under my bed forever they at least wouldn't be producing microplastics???? (is that even true really?)#like with most stuff that's environmentally bad it's still better to keep using it than to replace it before time#but like. if it's washing that creates the microplastics and otherwise they're just a relatively inert pile of plastic in my closet…#maybe it IS actually better to like. file them away until society works out Plastic Disposal decades from now??#idk. also this is all SO sad to me bc brightly-colored gorpcore would otherwise be my EXACT aesthetic#i was a patagonia baggies kid and i would happily be a patagonia baggies adult but. sigh!!#honestly this entire problem is too big for me#i have just enough brain to be making myself crazy abt it but not enough brain to know how to tackle it#and honestly the solution probs isn't really individual anyway#it'll be like. scientists working out microplastics filtration and safe degradation#and textile people developing better textiles going forward#anyway. sometimes you stay up too late and yr brain starts spinning in ways that feel exciting and productive but. aren't.
6 notes
·
View notes
Text
things that would make life worth living:
1.) if they made almond joys without the fucking almond (feasible. go online and find a recipe idiot)
2.) if my sewing machine had an automatic threader (hand tremors. also feasible I'm just fucking cheap)
3.) not working for my father (I'd have to fake my own death)
4.) if every against me! song was like twice as long
#this post was an excuse to complain about my sewing machine not having an automatic threader#the pedal is also way too sensitive. like my dog leaned his little tiny fat baby head on it and it went nuts almost took out my finger#ok so why don't you sew in a different room 5.) if I had a sewing table#monster growl
4 notes
·
View notes
Text


Another thing that had been on The Pile for some time was this velvet mite brooch, which I got out and finished today! I'm not entirely happy with it - the body is much too flat and the overall size is a bit bigger than I'd intended. But maybe someday I'll make another one that's smaller, with way more batting.
This red poly velvet had been in my stash for as long as I can remember and I don't know where it came from, but I'm glad I kept it even though I knew I wasn't likely to use it on actual clothing items. The legs are made from wire covered with little fabric tubes, and the body is 2 layers of buckram with some cotton batting, then another bit of covered buckram for the belly. I tried machine sewing the leg tubes at first, but it was a huge wonky mess, so they're all hand sewn.
I think it's much too big for a waistcoat, but could perhaps do on a jacket.
(For anyone who hasn't seen velvet mites, they're just as fuzzy and bright red as this, but plumper and more strawberry shaped. They're very very tiny and harmless. The ones I've seen in parks and on riverbanks are usually about 2mm long.)
2K notes
·
View notes
Text
Sewing 1890s Day Dress in Doll Scale
I went slightly overboard with this second historical doll project. Here's my first one. The style is from around 1897 and more of a middle class style. As with my first doll outfit, I tried to stick to historical methods as much as possible, but the scale forced me to do some deviations. I hand-sew everything though sewing machine was already widely used, because in this scale it's easier to control the stitch, there's not that much to sew anyway and also I just really like hand-sewing. Here's all the items I made. As said, I went a little overboard. One thing that's missing is the corset cover, but the layers of fabric were creating enough bulk on the waist as is so I decided to not make one.

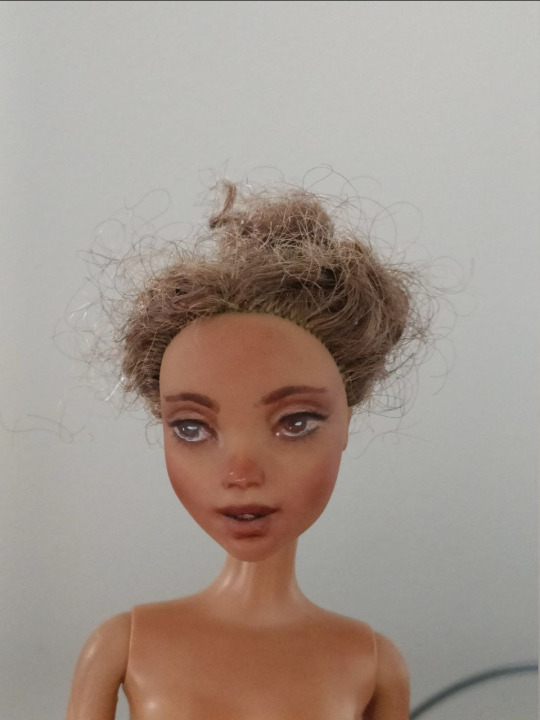
This time I decided to try repainting the face. I don't have any doll customization materials, so I used acrylics. After couple of attempts I got decent results. Acrylics can't make as smooth and delicate finish as pastels, pencils and gouache, which can be used on vinyl with basing sprays, and I'm not experienced with painting small details on 3D objects, so it's a bit smudged at points, especially with the other eye. I aimed for 1890s very neutral make up and the type of expression that was popular in fashion plates and other illustrations.
Undergarments
Combinations and stockings
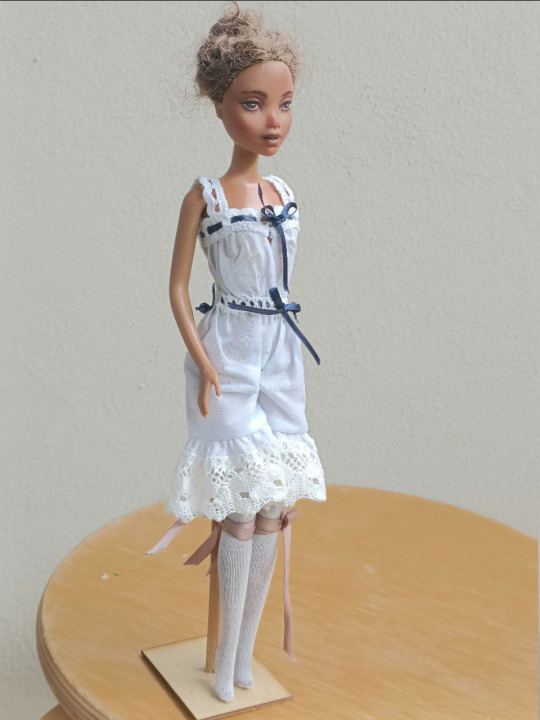
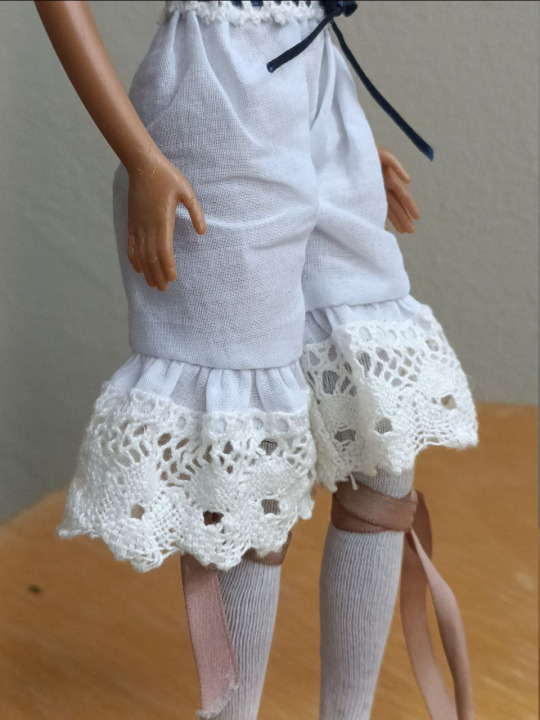
The combinations are split crotch as they were in the period. They are from thin cotton voile I have a lot of and is very appropriate. I didn't have really tiny enough lace for this, so it's kinda bulky, but I think it's okay enough. The stockings are cotton knit, which fits well. The garters are not actually necessary for this doll since her legs are rubbery.
Corset
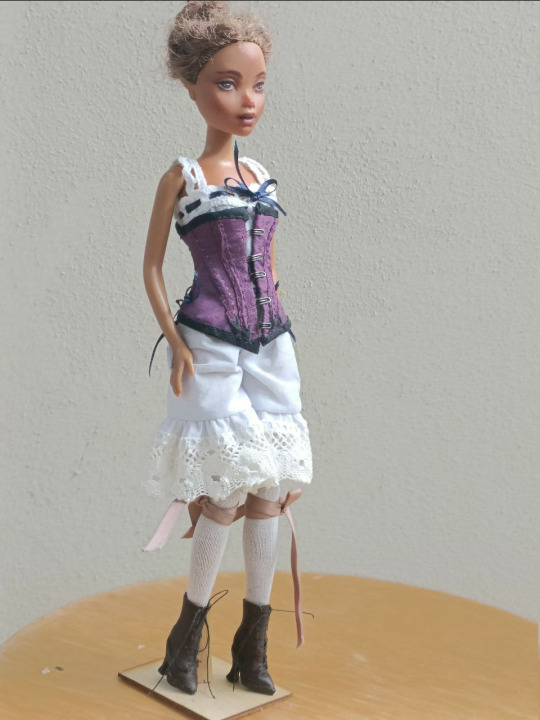
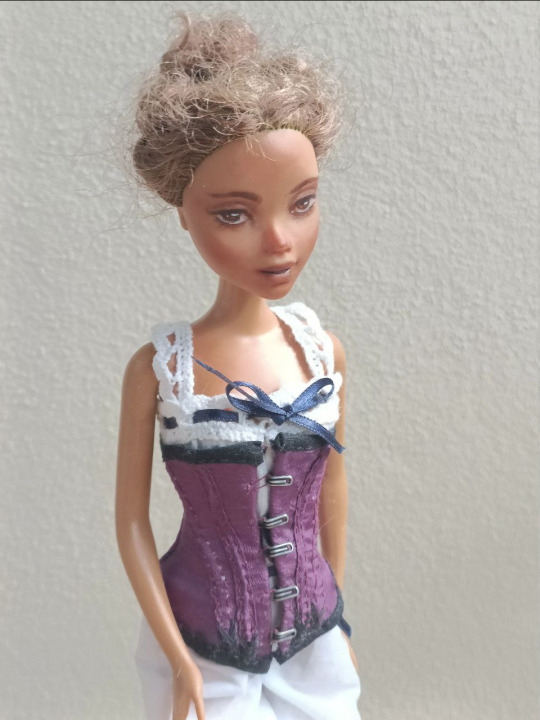
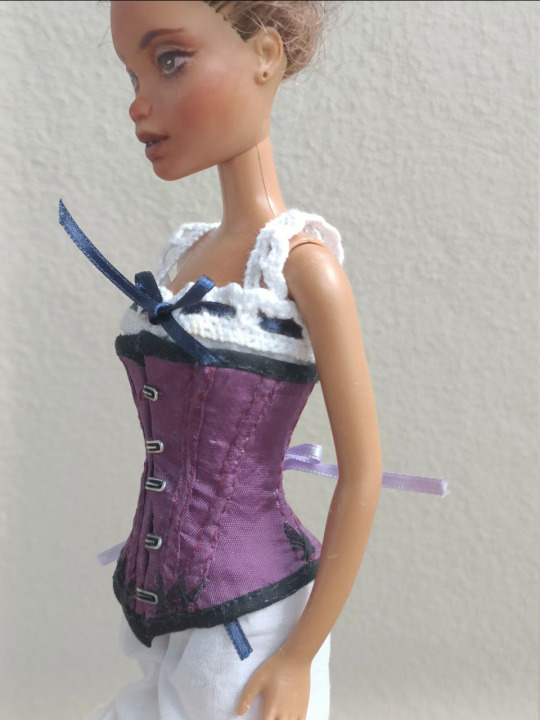
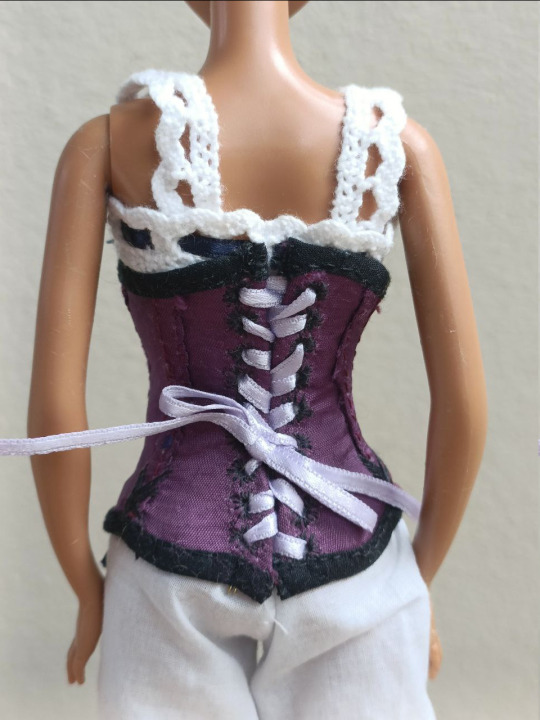
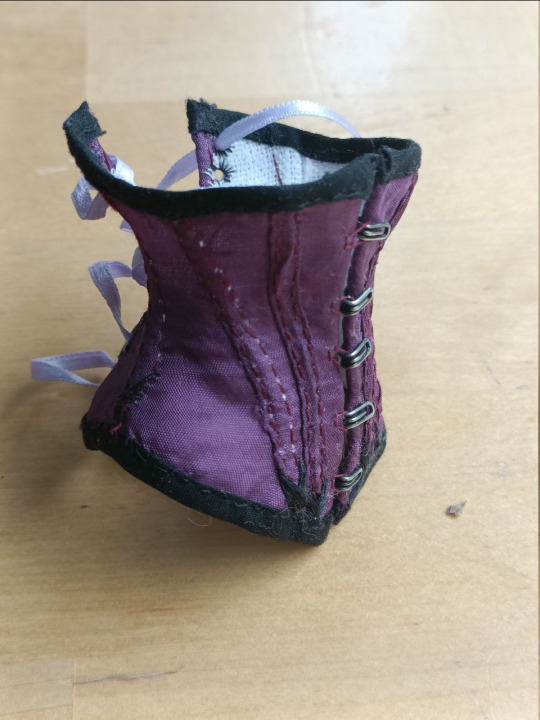
I made the corset from a firm-ish linen and satin rayon pretending to be silk as the fashion fabric. The stitching of the boning channels is not super neat, this fabric is very unforgiving, I didn't have exactly matching thread and the scale made it very difficult. I of course didn't have tiny busk, so I used small hooks, sewed thread loops for them and used narrow metal wire for the edges. I think it looks surprisingly right on the outside. I used the same wire as the boning to reinforce the lacing on the back. I didn't actually use boning elsewhere but the tightly packed linen edges in the boning channels kinda work like lighter boning. I think it keeps the shape pretty ways even with just that. I stitched cotton tape inside to shape the corset further. I also didn't have tiny metal eyelets so I hand-sewed the lacing holes.
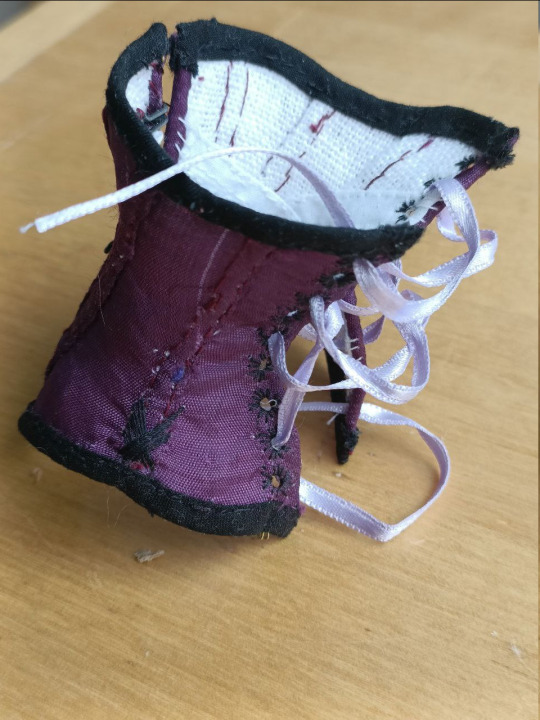
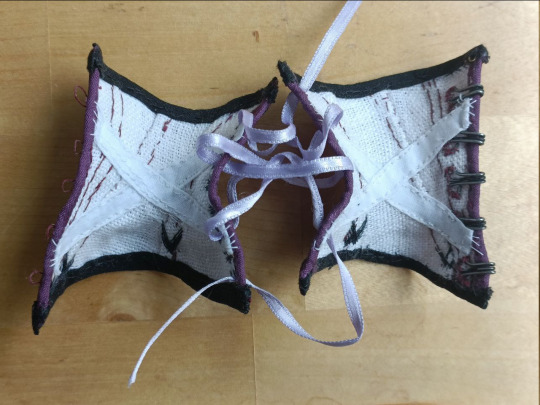
Bustle pad
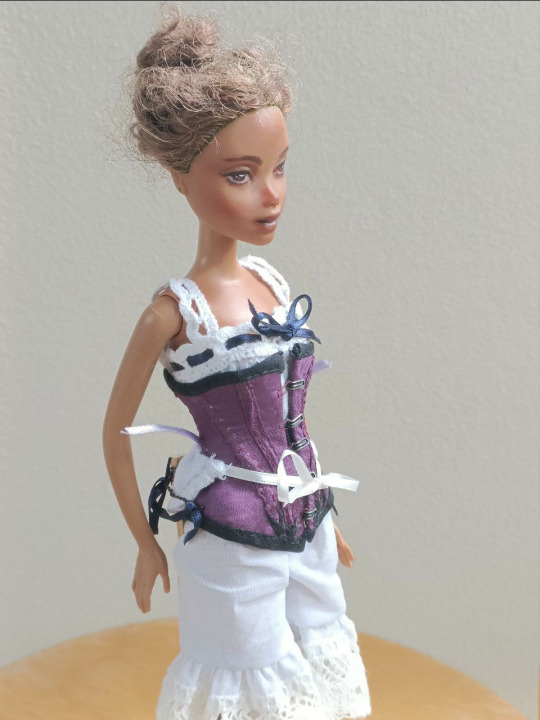
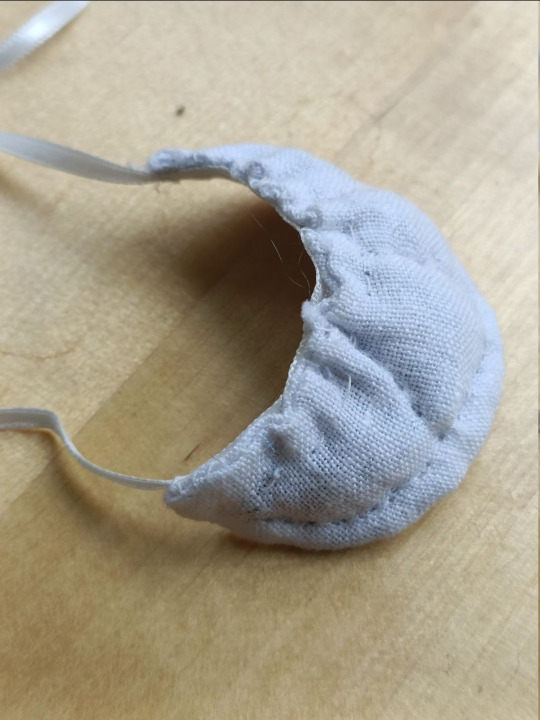
The bustle pad is from linen and stuffed with tiny cabbage.
Petticoat
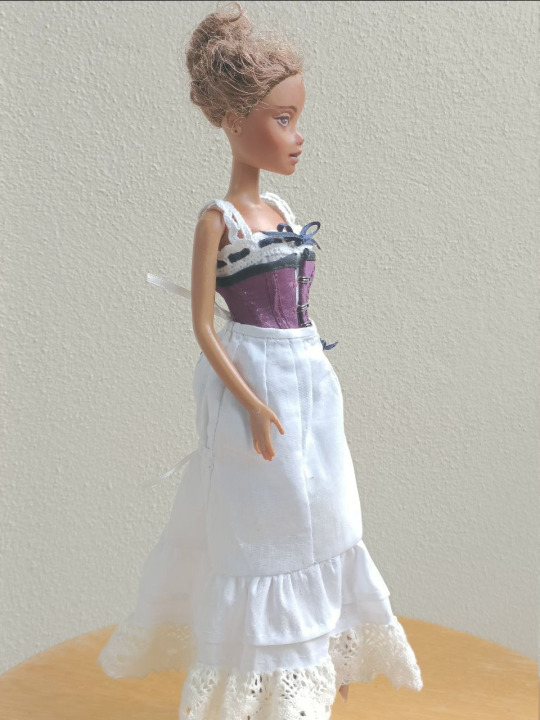
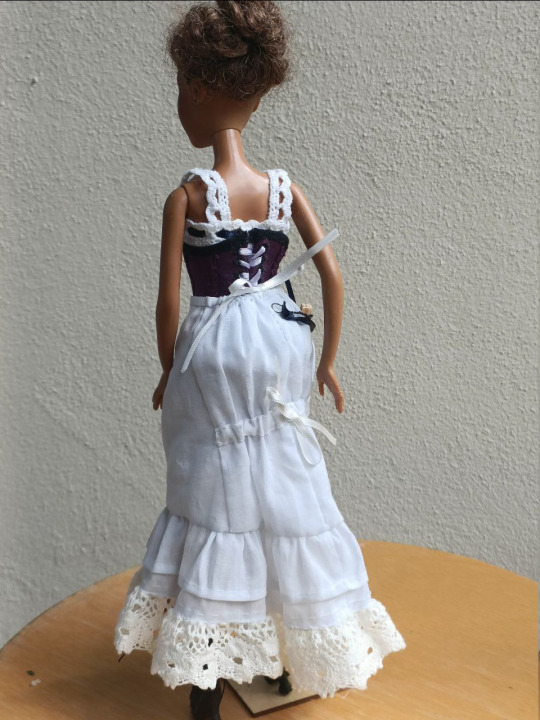
The petticoat is from the same cotton as the combinations.
Outer wear
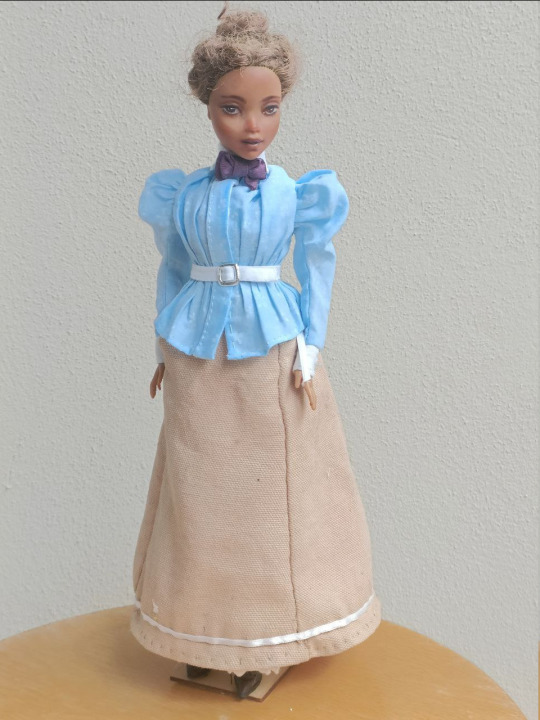
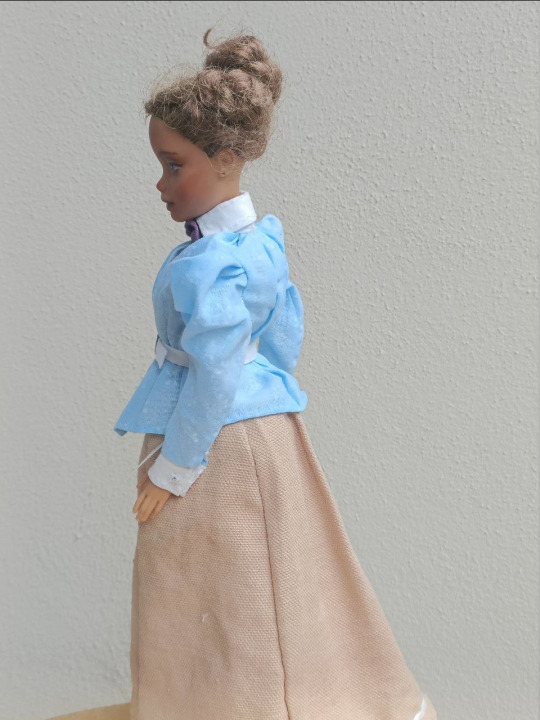
Skirt
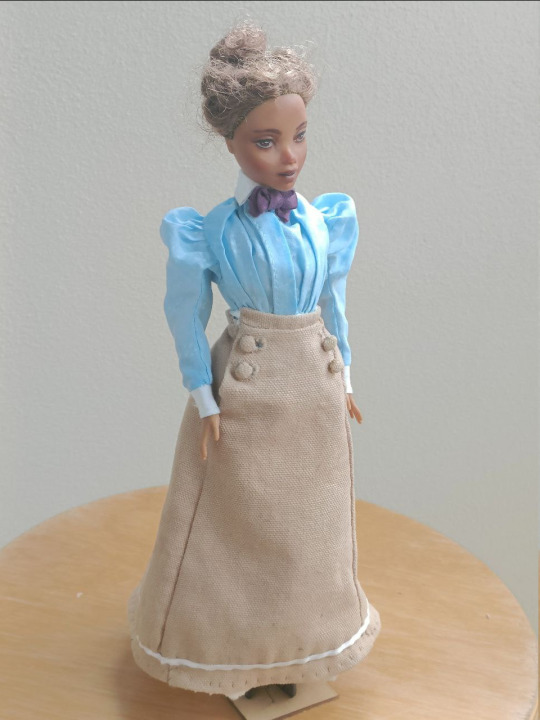
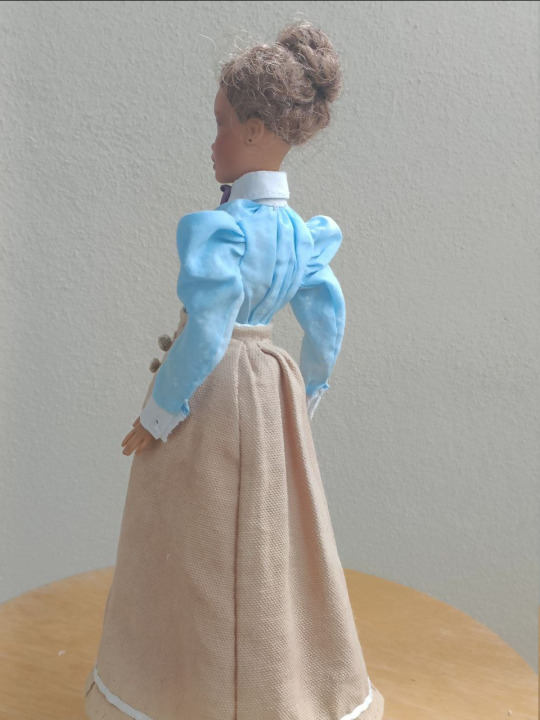
The fabric is cotton half-panama. It's pretty thin, but firm. I would have liked to use a woven wool, but I didn't have any that's thin enough to work in this scale. I think this cotton looks close enough in this scale to a wool with a tight weave, so I'm imagining it's that. My problem was that the cotton was white, but I wanted light brown. I wasn't going to buy any fabric for this, so I did the reasonable thing and dyed it with red onion peals (I've been doing natural dye experiments so this worked well for me).
Shirtwaist
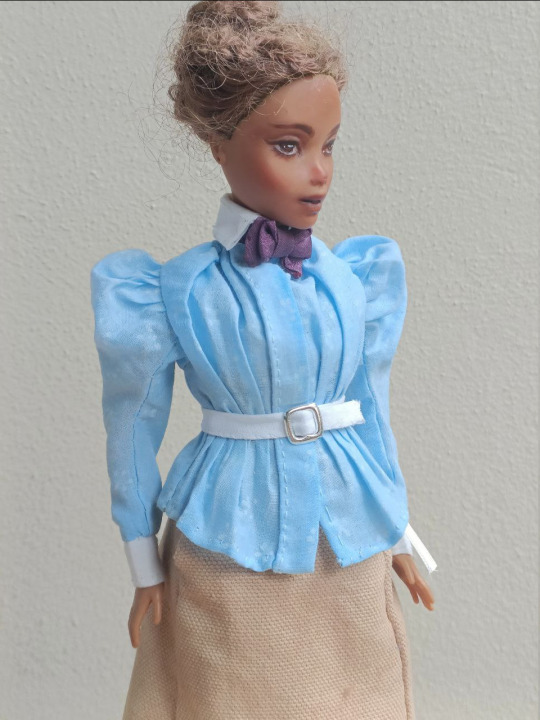
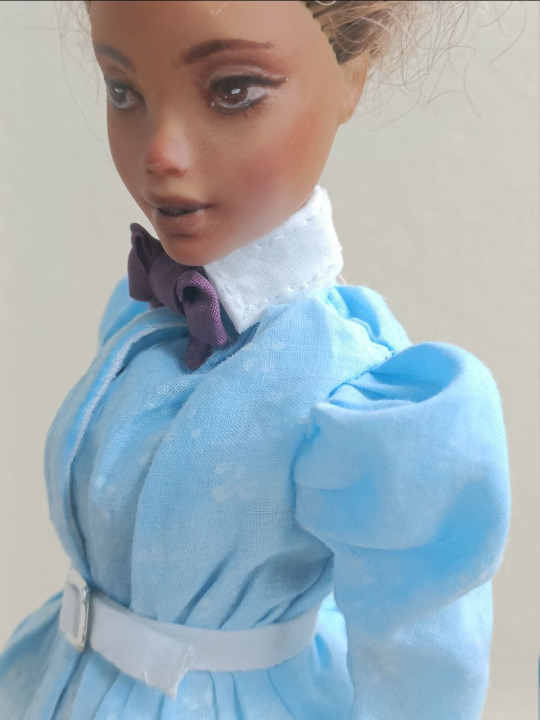
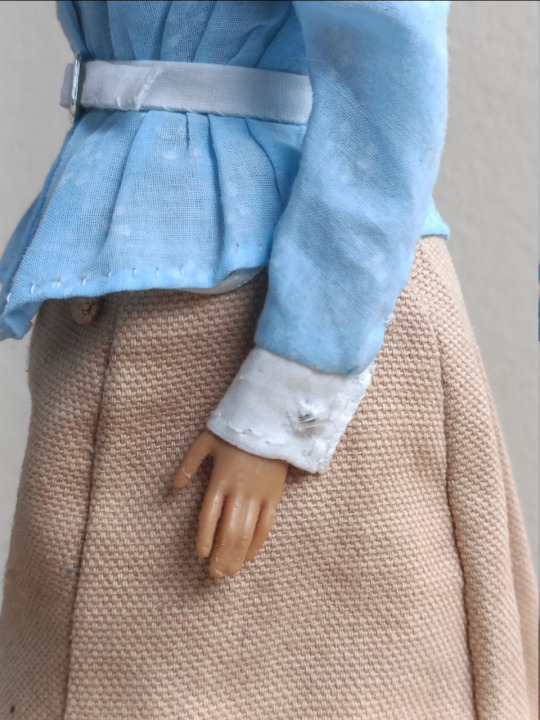
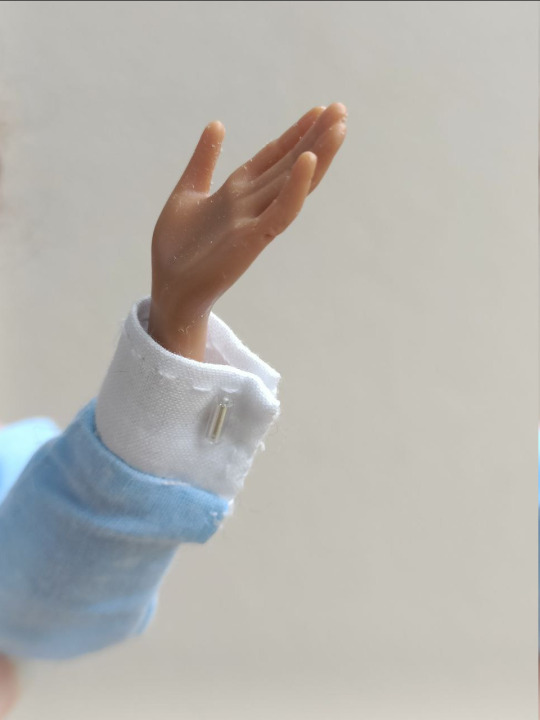
The shirtwaist is from the same cotton as the undergarments. Yes, I dyed it too. I didn't have thin enough cotton in a color that would fit with the skirt and the purple bow, so I dyed it light blue with fabric color. Since I already went the trouble of dyeing I decided I might as well make a small flower print to it since that was popular in the era. I didn't want it to jump out too much but the lighting makes it even less visible. I made it with a white fabric pen. The collar and cuffs are reinforced with linen. I also sewed small stick-like beads to the cuffs on both sides, so one acts as a button (I sewed a buttonhole too) and the other makes it look like they are cufflinks. The bow is from the same fabric as the corset and the belt is sewn from the same cotton as the shirtwaist. The buckle is from a barbie belt.
Waistcoat
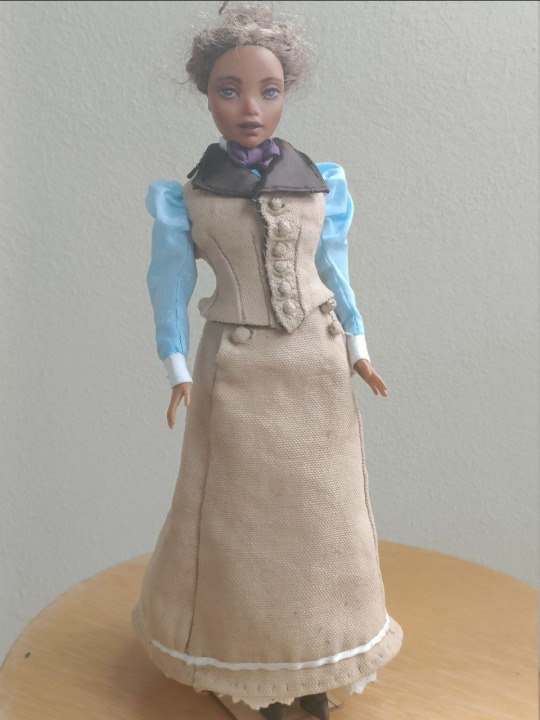
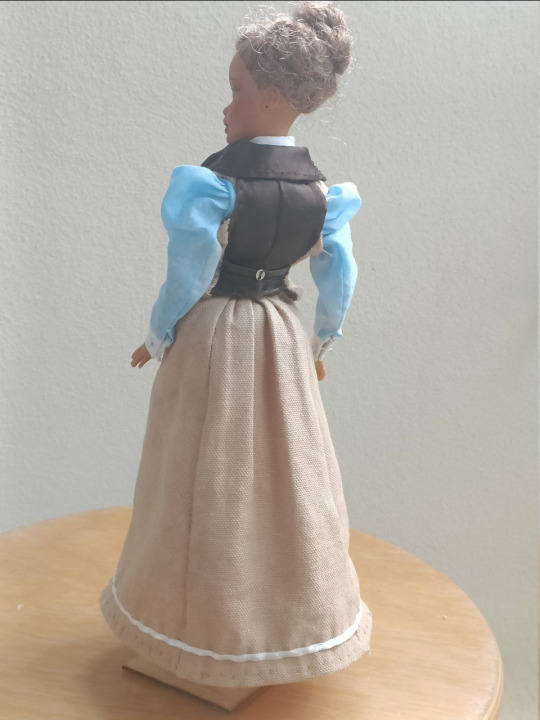
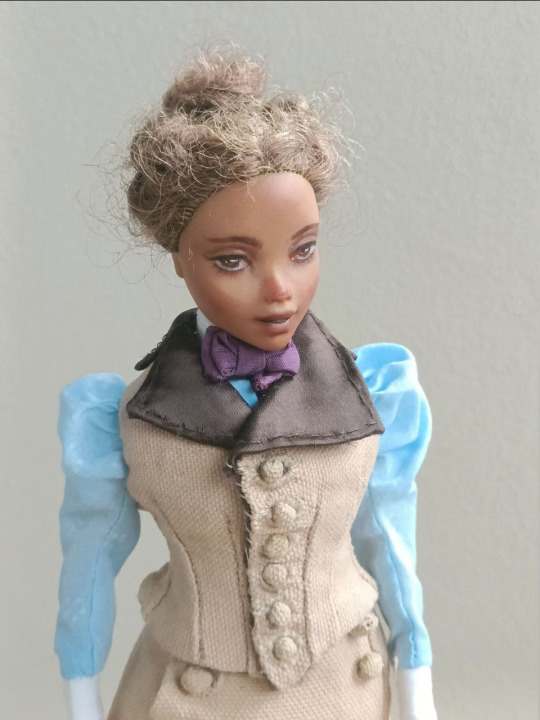
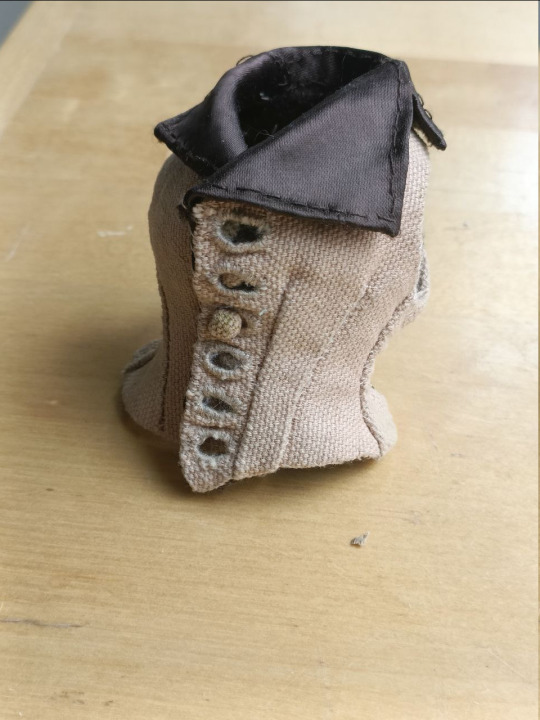
The waistcoat is from the same fabric as the skirt, thought the lapels and the back are from another satin rayon. I tailored the front panels and the lapels by stitching the linen interlining with tailor's stitches (I don't remember if that's the correct word in English) into shape. There is some wonkiness on one side of the hemline for some reason.
Boots
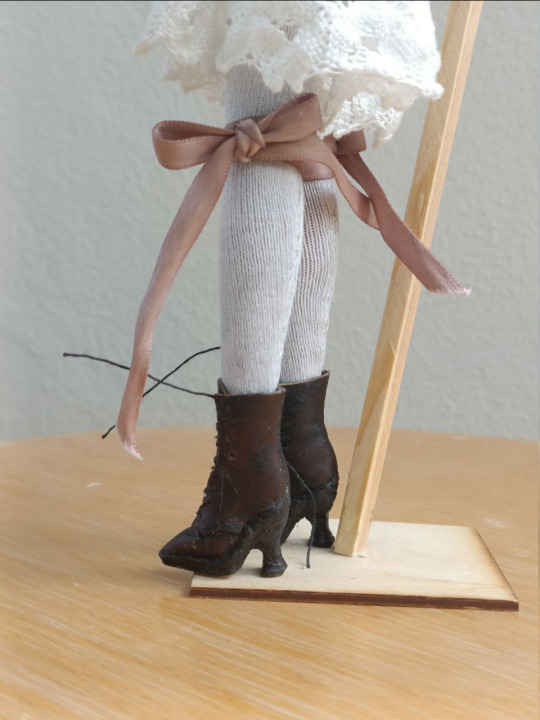
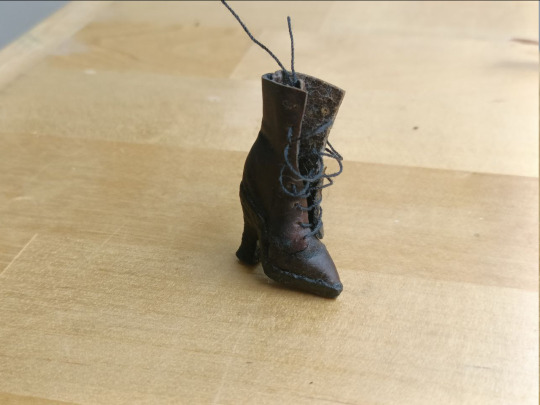
I made the slightly insane decision to make the shoes fully from leather, like they would have been in the period. I had an old broken leather wallet I had saved in case I needed some leather scarps. It has fairly thin leather, so it was workable here. It's light brown though, so I used black shoe polish to darken it. I wanted black or very dark brown shoes. I stacked the heels from glue and leather pieces and carved them into the right shape and sewed the shoe itself to leather shaped as the sole and glued it to the heeled and shaped sole. After I had shaped the shoes and the heels as much as I could I painted the heels black.
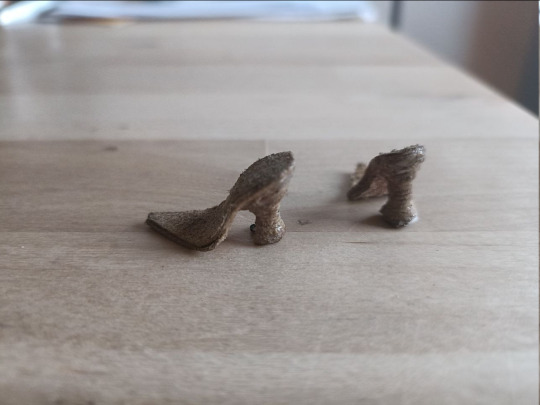
#historical fashion#fashion history#sewing#custom doll#ooak doll#victorian fashion#dress history#costuming#historical costuming#doll clothes#doll customization#historical sewing#my scene#my art#dolls
903 notes
·
View notes
Text
❥ — maramaxxing:
.𖥔 ݁ ˖ becoming prissier and sexier 🥂👛🐈⬛˖ ࣪
❤︎ ྀི˖𓍢 my personal pinkprint to aligning with my princess agenda—style, mindset, and routines to embody my future self. as I pivot in life, this will be one of my final blog posts like this. i’m transitioning it off blogging and will now document everything in my video diary… 𐙚
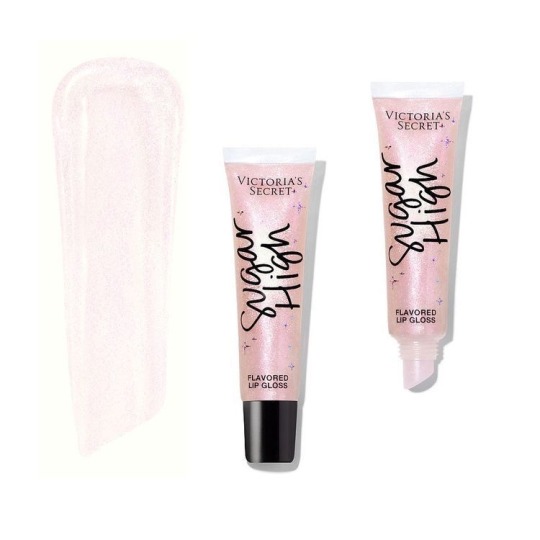
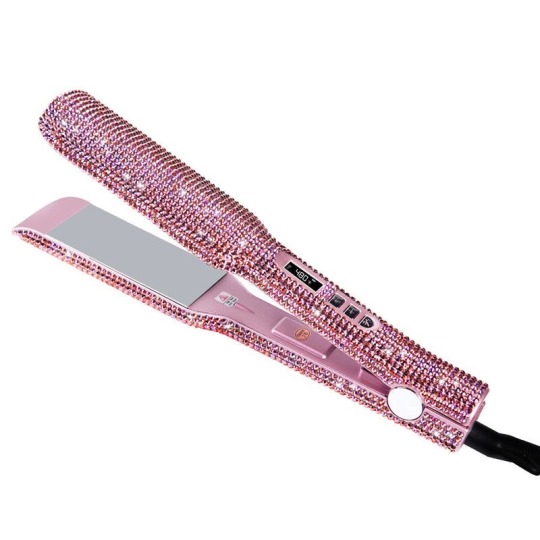

🎀 self prioritization, boundaries, and independence - i come before anyone else. i have no children and my only commitment is to make myself happy.
🍨 shadow work - to reveal what has made me how i am (strengths, traumas, interests, fears), i’ve done so much reflecting on my triggers and responses to specific stimuli. it feels good to know that i’m getting to know myself. that says growth to me.
🎀 studying my birth chart - finding out hope my placements, and which houses they’re in has really made my day to day interactions and experiences very insightful and fun to dissect.


🎀 so fab so glam lately - my vibe lately has been just g-l-a-m, glamorous. just oozing sex appeal and hyper femininity with a sophisticated twist. i can’t wait to document this on youtube.
🍨 bougie and sexy - black and satin have been a common theme for me. my aesthetic is naturally going in a very sultry direction along with animal prints, lace and diamanté detailing.
🎀 body mods - back dermal piercings, more ear piercings and super pretty tattoos, nothing too much just small and pretty embellishmentz!
🍨 fab color palette - brown, cream, soft pink, metallic accents (champagne gold, white gold), and leopard print. my everything.
🎀 gold n pink jewelry - this combo is so pretty on everything else so why wouldn’t be just as pretty on my personal adornments? ordered three gold and pink belly rings and i can’t want to mix the metals once my piercings heal.
🍨keeping a physical lookbook in my fashion diary - this year i’m not holding back. the looks are coming. the photos are coming. i want to document my fav looks, accessories, and details in real time. almost like personal portfolio.
🎀 sexy and grownifying my closet - investing in a luxurious, cohesive closet that says grown. gonna be using high heels and casual glamour to achieve this. the fabrics and cuts are extremely crucial too.
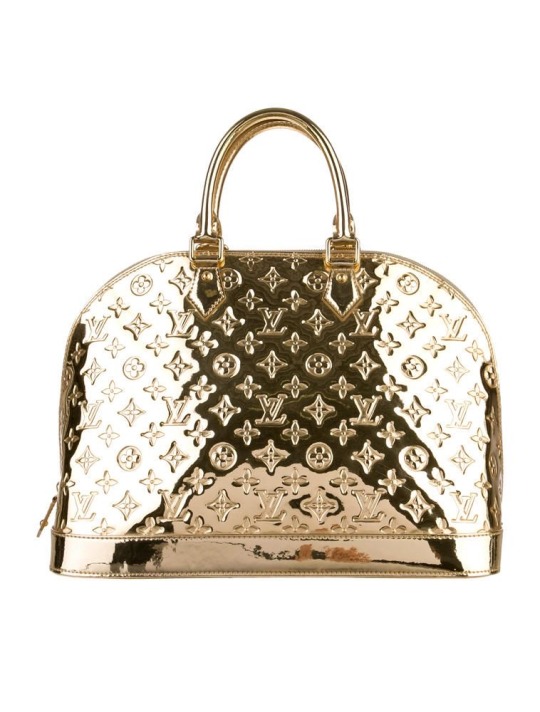
🍨 staple designer bags - if you know me you know i love designer purses. especially if they’re neutral colored and essential. i definitely plan on expanding my repertoire of bags.
🎀 customizing my wardrobe - i’m getting a sewing machine and i’m learning how to hotfix rhinestones to personalize and bedazzle anything i want to. i’m so so excited!
🍨 making my own jewelry - i’m so excited to talk about this! i’m making a kit of chains and threads along with beads and charms all in my color palette and i’m going to start popping out with so much custom made shit! body chains, waist beads, charm bracelets, just so exclusive + #prissy.
🎀 new makeup styles - been loving smoky eyes and black waterlines, overlining with a muted brown, lash clusters, rhinestones, and more sultry details.


🎀 currently healing my gut - psyllium husk supplements, fiber, kombucha/prebiotic soda, chia seeds and an adequate amount of water have all become a part of my routine over the last month or so and i definitely feel different.
🍨 #prettiedup - bleach my hair, signature makeup routines, regular nail appointments (found a tech that i can rely on 🎀), korean skincare + african black soap, and anything else to boost my beauty.
🎀 got a personal trainer to maintain my “skinny bbl” look - i’m a tall girl with long legs and that with a tiny waist and round butt is so my look. currently training for it and i’m pretty happy so far. at this rate, by the end of march i’ll be at my goals.
🍨 building my vitamin and supplement routine - collagen, probiotics + prebiotics, maca, berberine, + some hum essentials.
🎀 my love of teas - cannot live without tea. it’s my favorite form of caffeine. and herbal teas always help me feel as if i’ve boosted my health. my favorite teas right now are green tea, matcha, and double spice chai. also love black, spearmint, and raspberry teas.
🍨 weekly digital detox - one day a week i go out of my way to avoid my phone. i simply rely on other things for entertainment, radio for music and try to interact with those around me.
🎀 hair extension wardrobe - tape ins in natural black and honey blonde, vixen sew ins with 30” bundles (i’m a tall girl so long hair to me is at least 26”)
🍨 cycle syncing - i’ve changed the way i eat depending on where i am in my menstrual cycle. i find my gut responds to the things i eat better. even with the time of day, being intentional with the way i live my life is so important to me now.
🎀 new personalized diet - high protein and low artificial sugar is pretty much what i’ve been following. what i typically eat in a day is berries, rice, oranges, lots of water, almond and peanut butter, etc. my fav sources of protein are grilled chicken, sushi, steak, salmon and eggs. of course i still like sweets they’re for sure few and far between.


🎀 trust in my intuition - it’s taken a while but i’m finally learning to trust myself. if my body is telling me to do something i do it, i don’t try to force what isn’t there, and i respect my mind by honoring the discerning abilities i was blessed with.
🍨 gratitude and thought reframing - so many things in my life changed for the better when i learned to flip my thoughts. in a glass half full fashion. it’s literally the law of assumption. i’m forever grateful for everyone and everything i have. and miss universe has only blessed me with more because i’m now so much more receptive.
🎀 no bull shit + not easily impressed - i literally have the shortest tolerance. i expect a certain standard of behavior from those that wish to be in my presence and this is because i give a certain level of care, consideration, authenticity and respect.
🍨 manifestation journal - my literal best friend. everything i write in my LOA journal comes true. i’m not exaggerating. i read it in the morning and tend to write in it before bed. i keep it right next to my bed along with some stickers and gel pens.


🎀 semipermanent beauty treatments - making appointments for lash lifts and brow microblading as we speak. also super interested in finding a great medspa in my area.
🍨 youtube #vloggingbabe🎀 - i finally made my long awaited comeback and i’ll actually be recording some of the things in this post on video. i love recording and editing. it feels like the best form of self expression to me right now! subscribe!
🎀 glam squad (esthetics, hair, nails) - i’m so anal about things being seamless and easy to remember. i like to go the same place for particular services and i’m determined to find a reliable hairstylist and esthetician that i can stay loyal to (i already have a bomb ass nail tech)
289 notes
·
View notes
Text
Silk dance | Jayce

Aracne Jayce x Zaun seamstress reader
Jayce and reader have history before the Arcane plot. This story follows the second season of Arcane but loosely.
A complimentary piece to my previous story Up and Under. I was asked whether I would make a part two to it. I will rather not but I got the idea that there may be a little bit more to unpack amidst the pages of the story.

,,So, how’s it going with the girl?” Rhythmic buzzing of energy filled the air in the laboratory with a lulling symphony played by tiny machines. In the near silence Jayce Talis scribbling in his notebook posed as the only off-key element as he switched between the messy pages and a cogwheel on his workstation. Sky’s voice ruptured the melody of focus.
Jayce looked up, his eyes wide and lips slightly agape, as if the woman in the room spoke another language, one he didn’t quite understand. Sky was not looking at him, rather wiping off an oily stain from the counter. Her movement was steady, up and down, up and down, like she calculated every step she took in life.
,,I’m not sure what you’re talking about.” Of course Jayce knew what she meant. At times when he was alone the man beat himself over the fact that you were near him so often. He was aware how some might view this vicinity. On the other hand, he’s a grown man, he may do as he wishes and it’s only the shortsightedness of others that makes them full of prejudice. It’s not like every high-ranked man has to have an affair with a Zaunite woman working for him.
“She’s here often.” Up and down, up and down. The counter was already clean.
“You’re here often too.”
“I work here.”
“She’s also working.”
“How so?”
“I hired her. She’s a seamstress and a designer.”
“How many fittings does one need?”
“She’s somewhat of a visioner too, like me. You should never rush your work, Sky.”
“And because of that there is a need for nearly daily meetings?”
“Sky, are you suggesting something?” Jayce turned his full body towards the woman. She finally left the counter alone, dropping the cleaning cloth on its polished surface.
“I’m sorry sir, it was very inappropriate of me.” Her shoulders slouched and she was avoiding his gaze like fire. “I’m just worried. it’s either people whispering and spreading gossip or you going to the undercity. It’s dangerous.”
“If inventors cared about whispering and gossip, there would be no progress in the world.” Jayce turned back to the cogwheel, picking it up and spinning it around in his fingers, trying to convince himself that the whole conversation was about progress and not -
Sky whispered something in the lines of that’s not what I meant but both of them decided to let the topic evaporate. A moment of silence spread between them, pushing the two even further away. If Jayce wouldn’t be so hard in his head he might have felt Sky’s gaze on his back, her pleading, longing look. Yet, he didn’t, because that’s simply who Jayce Talis was - a master in avoiding what he didn’t want to face.
“I’ll take my leave.” Sky’s voice once again rifled through the steady silence that rose to discomfort. The energy buzzing in the air felt like tension. Jayce just wanted this to end, to get back into a good mood before -
“Is anyone here?” A new, third voice entered tonight's opera.
Bad timing sweetheart. Jayce thought to himself and froze upon realising how caringly he just called you in his head. Due to that he missed the bite that Sky put on her own, tightly knit, lips.
The man turned around finally, taking in the whole of the scene. It was a true comedy-drama. Sky’s face was a mixture of disbelief and irritation while your eyes were filled with sparkles, clutching the sewing supplies and admiring the scenery around you. Jayce was right when he said you two were somehow similar, the same buzzing inside your veins when you had an idea, the same eagerness and urgency to put your hands to work. The same, slightly, crazed look when focused and the same hope for a better future.
Despite how heartless it was for anyone who could look upon the situation from outside, at that moment Jayce simply couldn’t look away from your smiling face. And he smiled back. Sky was already gone, only a quiet creak of the doors reminding she was there in the first place.
,,Should I - um.'’ you weren't sure what to say, it felt like your presence interrupted. Jayce was quick to ease the misunderstanding.
,,It's nothing. Be my guest.” He gestured for a seat next to one of the spacious counters. Grabbing a cloth scattered near his cog he whipped his hands and started undoing the buttons keeping his shirtcuffs tight.
With a smile and a shrug you began to unpack your supplies. A yellow measuring tape, pins, very sharp scissors and a variation of fabrics Jayce allowed you to buy samples of. There weren't many restrictions when it came to quality nor price. You rarely had a chance to get ahold of so many exquisite materials.
,,So.” He started eying the roll of samples you placed along the counter.
,,So?’’’ You mimicked like a little parrot.
,,Which one do you recommend?” Jayce picked up the scraps, examining the small squares as if he knew what made one another different.
,,Oh, it depends on what you're looking for.” He was just about to ask you for details but your knowing smile kept him silent. With panience unlike him, the man listened as you opened up the world of textile for him. ,,From the ones I selected silk will present itself as the most luxurious. It's soft, shiny under light, liquid like in nature but also cold.” Jayce watched you thumb the material, handing it over to him. On the peripheries the square was indeed colder but in the centre, where you held it, the silk remembered your touch. He thought that you must be warm yourself. ,,Linen is less sparkly, more manly one could say, but it has a certain unruly feel to it if you ask me. It reminds me of nature.” Manly. Jayce liked how the word danced on your lips. ,,And of course cotton is a safe option, comfortable, trustworthy and good-looking. There are also different colours in the pallette -”
Your lips were producing a number of words, some about the tones that these different variants of white may bring forward from his skin, something about how he should consider the shirt in reference to other parts of the tuxedo, and some other things. It was a long day for Jayce, he felt the tiredness and stress weigh his shoulders down when he shimmied out of his current jacket and shirt, sitting on the stool in only his undershirt. It was hard for him to focus when it was so late in the evening, the stars popping in the night sky, his mind slowly shutting down from the all-day-long struggle, your hands roaming his forearms. If he wasn't a gentleman he would close his eyes and ask you for a massage. He laughed to himself absentmindedly.
,,What's so funny?” You asked, putting hands on your hips. ,,Don't tell me you're one of the people who say they don't see different shades.”
,,Oh no, no. I definitely see a lot of colours.” Like the red of your lips and the tint of your cheeks and the tone of your hair that I thought about last night.
It was improper of him, he only proved Sky's stereotypes further. Yet, was it criminal to feel a little something for a person that smiles at you so gracefully, someone that shares your ideas at heart, another being that makes you feel comfortable. It won't hurt anyone if Jayce daydreams a bit about anything different than hextech.
,,-chandeliers.” Your voice rang in his ears, reminding him that the object of his tricky attraction was standing in front of him.
,,Once more.” With a smile he erased your slight irritation.
,,You asked me which one I recommend. While I like cotton for its usefulness I believe a ball requires something more… sophisticated. Silk will look fantastic in the lights of the chandeliers.” You repeated, giving him the evils.
,,Silk it is then. Do you think it will suit me on the dancefloor?” Jayce stood up abruptly. ,,You said you're good at imagining designs, at mapping them in your head. Then come and tell me will it suit me on the dancefloor?” He raised his hands as if to waltz. Just a little bit of flirt won't kill anyone.
With a laugh you walked around him trying to portray the seams and shapes of the soon-to-be shirt.
“I can definitely see you in something enhancing the back, something simple, with details to be left shocking.”
,,Details such as…”
,,Such as an interesting collar and buttoning at the front. Something here.” You said and pointed at his chest.
,,Mhm''. He murmured, grasping your hands, tugging you delicately where he wanted you, as if you were dancing.
,,I ope you own any accessories because an outfit without them is as good as going out naked.”
,,Naked you say.”
You stopped your slow swirling and looked at each other. In that moment Jayce Talis wished that the ball never began, that he was stuck in this moment of preparation, that he had an excuse to ask you over, that he never had to think about all the things that put your worlds apart and made this impossible. In the morning he will look Sky in the eye and feel a ting of shame, he will walk past other residents of Piltover and turn a deaf ear to their whispering, he will push himself to the limit with his work. All of this will be his payment for the moment of weakness, for allowing himself to hold you in his arms and whisper into your ear sweet little nothings.
#jayce talis x reader#jayce x reader#jayce x#jayce x you#jayce talis x you#jayce talis x y/n#jayce talis#arcane jayce#arcane
280 notes
·
View notes
Text
COUCH POUCH!! Free Pattern & Tutorial
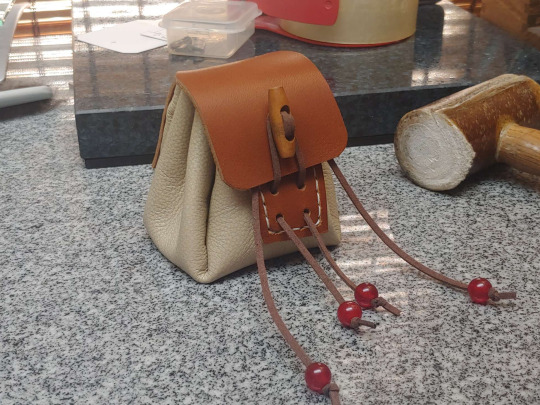
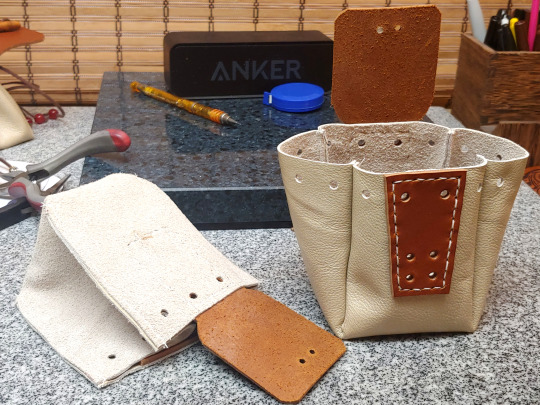
...called thus because they use upholstery-weight leather for the bag body, that in my case was in fact skinned off a couch. 🤣 Turns out they are relatively quick and easy to make, so I tidied up the pattern for printing and took pictures to document the process when I made another five of them.
First off, print your pattern, 100% scale:
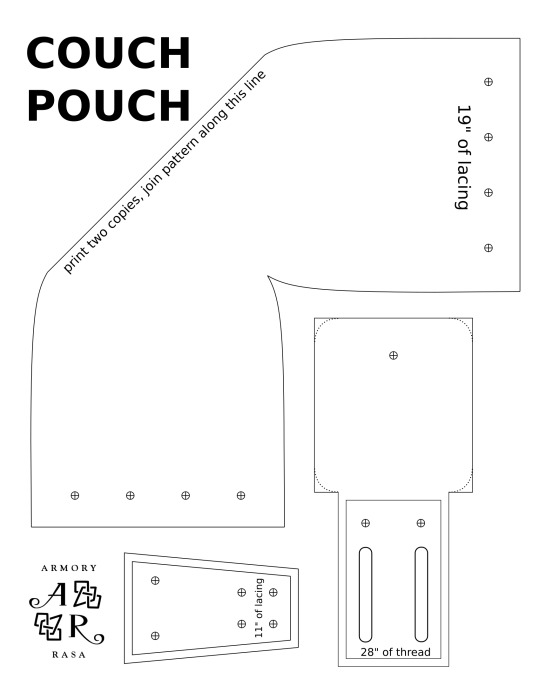
The bag shape was a modified version of the pattern I used for the Morpheus sandbag, but sized to fit in the roughly 11" squares that my couch skin came in. It makes a bag that sits very well on a tabletop, thanks to the flat base.
Though it turned out to not be the most efficient use of material, because that plus-shaped pattern tessellates well, if you're cutting them out of a full hide, but makes a lot of waste when you're cutting them out of squares of material. A more efficient design would have a half-rounded front and back, and a gusset between them, like so:
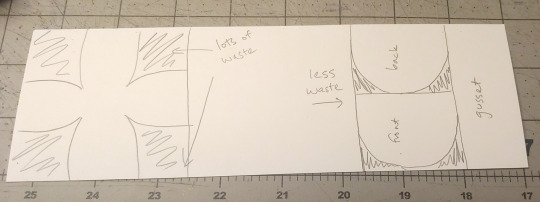
Ah well. It's not like I have any shortage of couch skin, though for the next round I'm going to experiment with a more efficient pattern.
First step, trace and cut out the bag body from your chrome-tan leather:
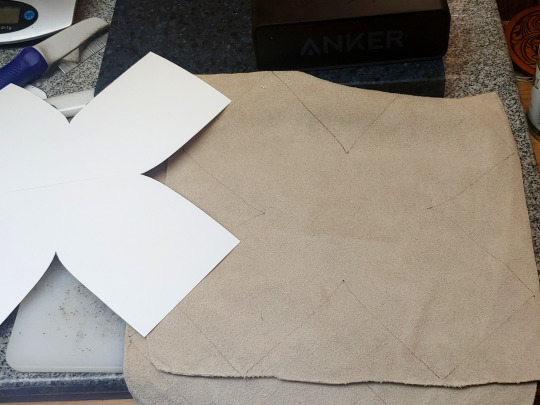
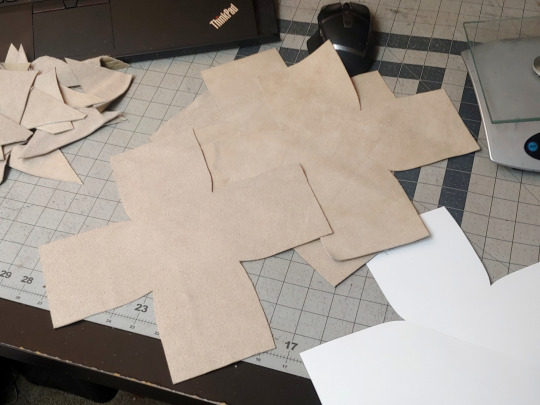
Like I said, this was upholstery leather, but anything that's flexible and ~1.5 mm thick will do.
The flap and front need to be a stiffer leather though -- I used 7 oz latigo, but veg-tan would work equally well. (And then you could ✨tool it!✨)
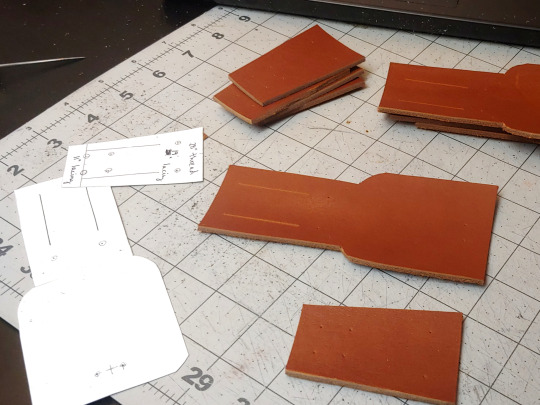
Cut them out, and then use the pattern to mark where your holes are going to be. Mark the holes on your bag body too:
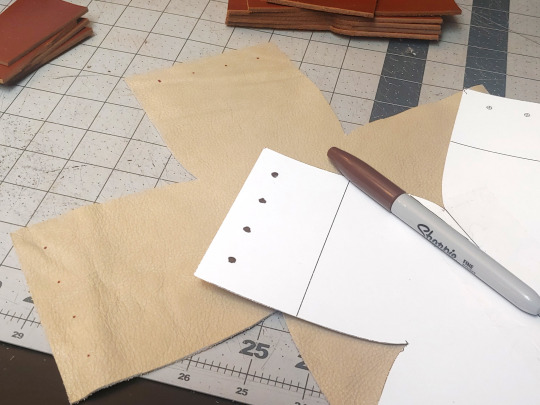
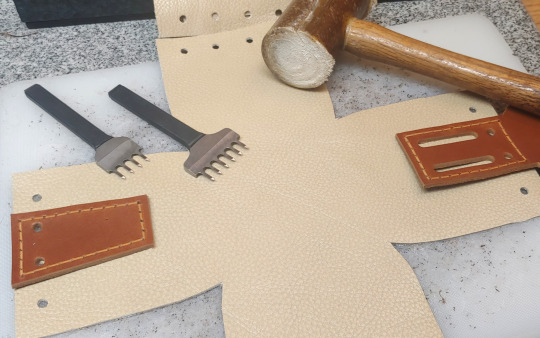
The latigo pieces get hand-stitched to the bag body, so I used a stitching groover to carve out little channels for the thread -- it's not strictly necessary, but it makes your stitches lay a lot more neatly:
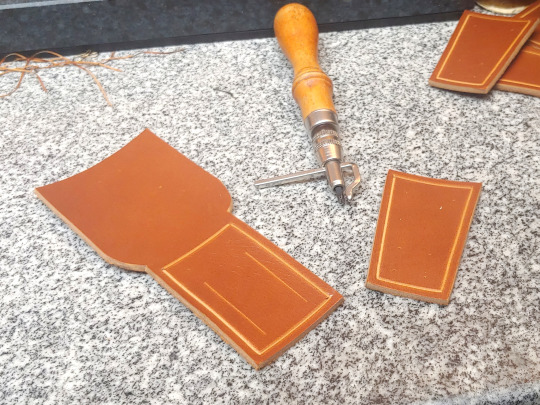
Punch the holes shown below:
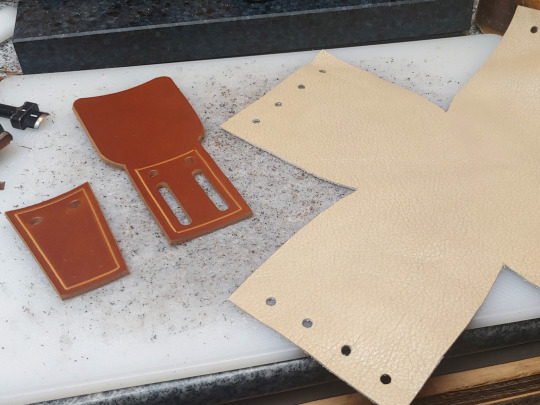
I used a ~5 mm hole punch for those, and a 1.5" slot punch for the belt loops. Some of the holes on the front piece you're not punching yet, because they need to go through both layers.
I put a dab of contact cement on the pieces (circled in white) to help hold them in place when I go to punch the stitching holes:
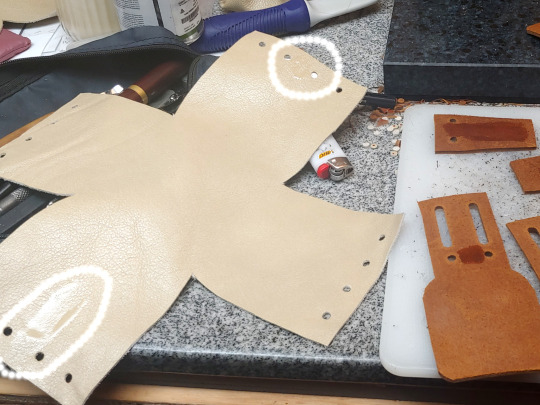
(Make sure you're not putting glue between the belt loops)
Wait fifteen minutes for the contact cement to dry until tacky, and then line up the holes and the edges and press the pieces together:
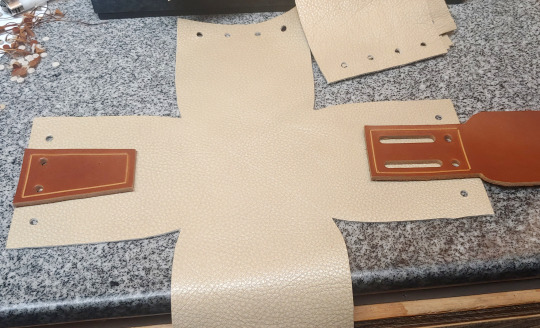
Punch stitching holes:
Saddle-stitch both pieces in place (takes 28" of thread per):
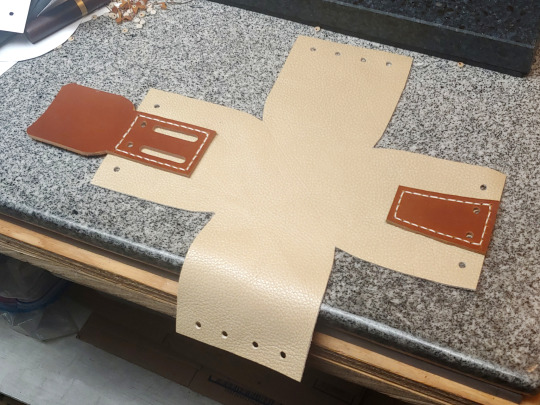
Now you can punch these holes:
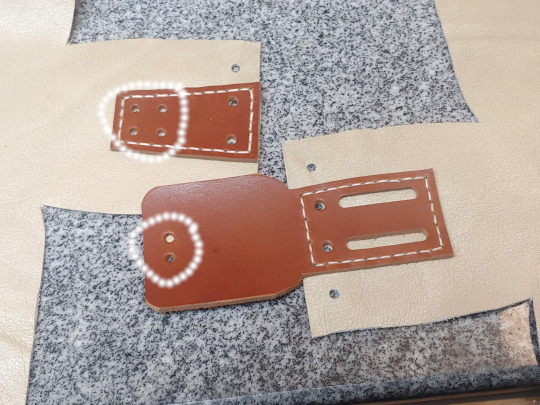
(I used a slightly smaller hole punch than for the others, but it doesn't really matter.)
Now press the right sides of the leather together and sew up the seams from the inside:
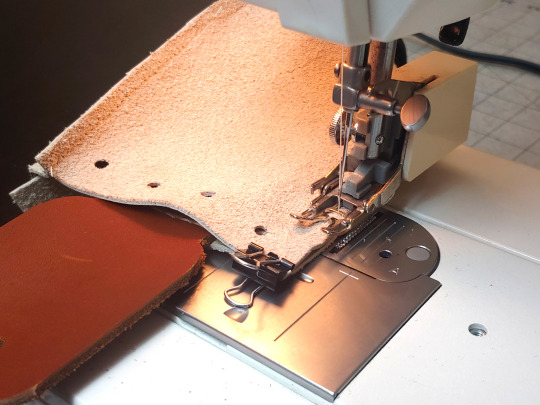
A regular sewing machine should be able to handle this, though you will need thicker thread, a heavy-duty leather-sewing needle, and a walking foot attachment. (If you don't have a walking foot attachment, it is SO WORTH getting one, even if you don't expect to sew much leather. Seriously, I use it for everything -- once you go walking foot, you don't go back. 💀) Because you can't pin leather without leaving permanent holes in it, tiny binder clips can be helpful for keeping your material lined up.
What they look like when you're finished sewing:
Cut 19" of lacing for the drawstring, and 11" of lacing for the toggle:
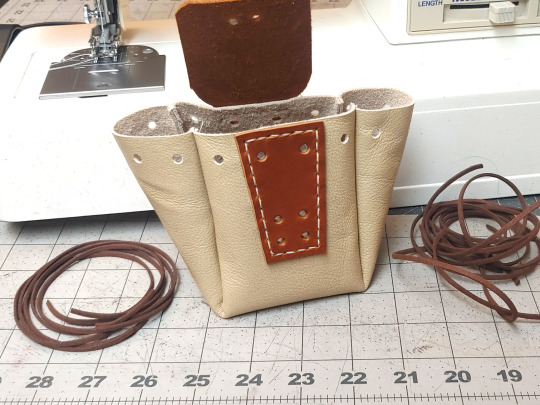
I use the 1/8" EcoSoft lace from Tandy, I think it's stronger than real leather would be at that thickness. The only important factor here is that you need something with a bit of texture and friction -- a silk cord isn't going to stay closed, it's going to slip open.
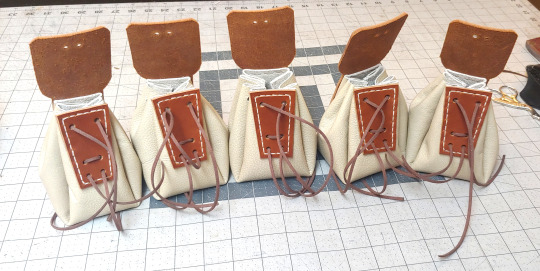
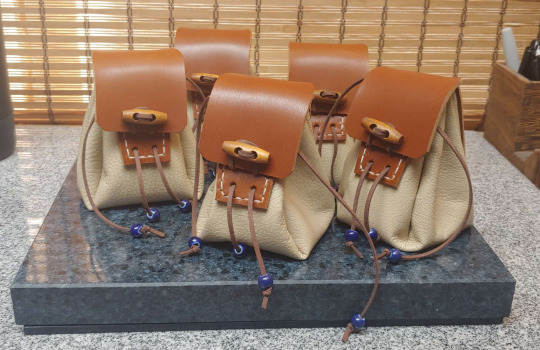
MANY BAGS.
For these I used a wooden toggle -- cut another 8" of lacing, looped it through the toggle twice, and then made a tight square knot on the back:
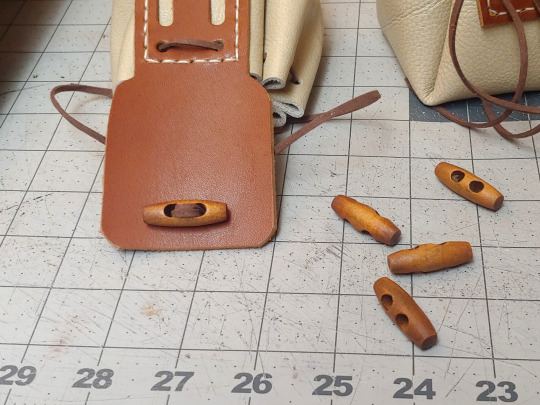
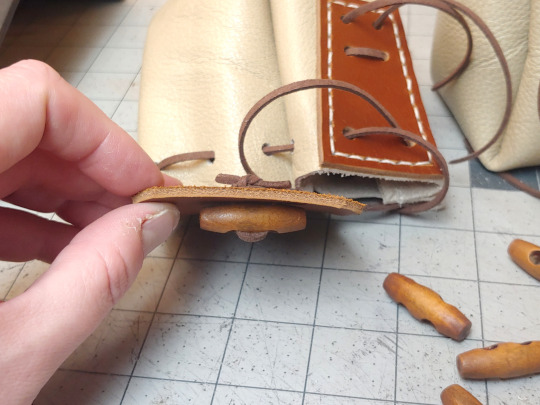
But another option is putting a concho or a large button on the flap. The bag I copied this design from, in fact, uses a concho toggle:

Thread some beads on the laces to keep the ends from getting lost, and you are DONE! 😁
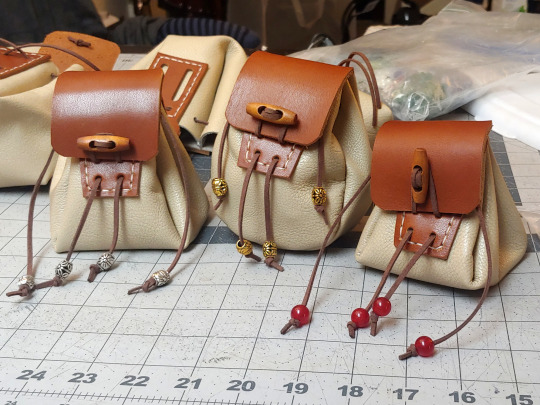
Happy Bagging!
709 notes
·
View notes
Text
Photobooth
Your first date with seungmin, except he pretends he's confident when he's just as nervous as you.


You quickly go down the stairs, trying your best to steady your racing heartbeat, but it only quickens as your gaze lands on Seungmin. He's wearing a black blouse, his hair slightly tousled as if he ran his fingers through it multiple times. His face lights up once his eyes set on you.
"Hey," he smiles as he walks up to you, a single red rose in his right hand.
"Hi," you smile back, a rush of butterflies erupting in your stomach, fluttering their wings all across your body.
"You're beautiful," he compliments, eyes tracing your face over and over, drinking in each one of your features. He didn't tell you that you looked beautiful, rather that you are beautiful. As if it doesn't matter what you wear, as long as it's you.
"Thank you," you reply, a wide grin spreading across your face. "You're beautiful too."
"I know," he smiles confidently, prompting a playful eye roll from you. "Right, let's go," he abruptly says, handing you the flower and grabbing your free hand into his. His fingers seamlessly intertwine with yours, and he doesn't look at you as he starts walking, as though this is second nature to both of you. As if your heart isn't on the brink of bursting from your chest, ready to spill its emotions at his feet.
Seungmin leads you to a hidden arcade, where the next two hours quickly go by as you take turns playing the various games- and competing in them. Your stomach aches from how hard you've been laughing; joy coming naturally to you when you're with Seungmin.
You're standing in front of a claw machine- your third attempt to retrieve a frog plushie. It's kind of weirdly sewed, and the color is neon rather than pastel, but you want it still.
"Still not giving up?" Seungmin smiles, as he leans against the machine's glass. "These are a scam, the odds of you winning are very slim."
"Keep your pragmatism to yourself," you reply, inserting another coin. The allotted fifty seconds go by in a blink of an eye, and you fail once again.
"Forget it," you pout. "I'm thirsty do you want something to drink?"
"Sure, just water. Can you order? I have to go to the toilet."
"Okay," you give him a thumbs-up before heading to the register. The queue is long, since apparently, everyone around is craving something too. Fifteen long minutes go by before you finally receive your coffee order. You bought an iced americano for Seungmin too, you know he can never say no to those.
"I'm back," Seungmin drapes his arm across your shoulder, drawing you closer to him. "Here," you bring the straw to his lips and be sips from his drink diligently.
"I thought you only wanted water," you chuckle and he scrunches his nose at you.
"Fine, keep your coffee and I suppose I'll keep this," he brings out the plushie you've been dying to win.
"You got it?" you ask incredulously, taking it from his hands excitedly.
"Mm."
"But I thought these machines were a scam," you repeat his earlier words and he shrugs. "I mean they still are. But you really wanted it."
"Thank you," you murmur, pulling him into a grateful hug, your chin resting on his shoulder blade.
"Anything for you," he mumbles into your hair, his arms blanketing you in a warm embrace.
You are walking hand in hand, stomachs full from the dinner Seungmin just treated you to. He insisted on paying, and you made a mental note to buy him coffee for the next following weeks.
"Look!" you point excitedly to a photobooth on the side of the road. "Should we go in?" you propose and he nods, pulling you in.
The booth is tiny, leaving room for only one stool at the center of it. Seungmin settles on the seat, before pulling you on top of his lap. You feel a crimson red blush bloom on your face, as Seungmin fixes up the camera's setting. He seems at ease by your close proximity, and you take in a deep breath as the timer starts counting down.
You plaster a smile on your face, Seungmin's hand wrapping around your waist as you both pose, flashing a peace sign. A giggle escapes you as he gently tickles your sides. "What should we do now?" he asks.
"Let's blow a kiss to the camera," you suggest, and he shakes his head slightly, an amused smile drawn on his lips.
You pucker your mouth, blowing a flying kiss as the camera snaps a photo of the two of you. But you soon realize Seungmin isn't staring ahead- he's looking at you.
"What?" you giggle nervously, and he tucks a strand of your hair behind your ears, eyes fixated on yours. "I really like you," he confesses in a hushed tone, leaving you overwhelmed by the warmth of his body, his velvety voice and the weight of his words.
"You make me very flustered."
"So do you," he giggles sheepishly and you raise a brow at him. "Really? you've been so sure of yourself this entire date."
"Can't you feel my hands shaking?" he asks softly and sure enough, slight tremors are cursing through them. Almost imperceptible, but it's there.
"You drive me insane. I think I almost died each time you smiled at me tonight."
"That's a lot of near-deaths."
"I know," he smiles at you, but it slips away slowly as his eyes land on your lips. "Can I kiss you?"
"Yes." Your reply comes out breathless, as his warm hand cradles your cheek, beckoning you closer to him. His mouth falls perfectly on top of yours, the camera's click a mere echo to you as you lose yourself into the kiss. His cheeks are heated up under your touch, a contented sigh leaving him as your lips meet once again. And again, and again, until you lose count.
You pull apart dazed, and Seungmin places a much sweeter kiss on your forehead. "I really like you. I'm afraid of messing this up."
"You won't. I really like you too."
Seungmin buries his head in the crook of your neck, as you rub your hands softly across his back.
"What is it?" you smile and he shakes his head. "I'm malfunctioning give me a minute."
"What happened to your confident self?" you tease and he chuckles lowly, the sound traveling in your body and carving its melodies into your heart.
"Got tired of pretending."
"You don't have to. I really like you, if I hadn't made it clear."
"Yeah I don't think I will make it through the night," he sighs and you laugh loudly, pressing a kiss to his cheek. It felt comforting to know you were both just as flustered by each other's existence.
You finally get out of the booth to find the picture printed out. You and Seungmin doing a peace sign. You blowing a kiss while Seungmin stares fondly at you. You and Seungmin looking at one another. You and Seungmin lost into the kiss.
"It turned out nice," you hum and he nods, throwing his arm over your shoulder once again. "It really did."
You keep the picture safely tucked in your wallet; only taking it out to frame it in your new house with Seungmin, five years down the road.
#stray kids x you#stray kids x reader#skz x you#skz x reader#kim seungmin x reader#seungmin x reader#seungmin x you#stray kids fluff#skz fluff#seungmin fluff#stray kids imagines#skz imagines#skz scenarios#skz fanfic#kim seungmin imagines#seungmin imagines
2K notes
·
View notes